During this year's //build conference Microsoft officially announced a new member of the Visual Studio series called Code. As described by several people already it is a HTML5, JavaScript/TypeScript based text editor hosted inside the Electron shell and it runs natively on Windows, Mac OS X and Linux. This article hopefully gives you some ideas during installation and assistance to have an improved experience out of the box compared to the standard option - at least at the time of writing this article.
Getting Visual Studio Code
I started using Visual Studio Code since the first released version 0.1.0, and being part of the Insider Preview program for VS Code I managed to download and get the latest version always using this short-listed link:
Which is an alias for this web address: https://code.visualstudio.com/

Get the latest version of Visual Studio Code from the web site
Microsoft's web site of Code detects your operating system and directly offers you the best download option based on your current browser. I'm currently running Xubuntu 15.04 x64 - Vivid Vervet and the site offers me a direct link to get the latest 64-bit version of Visual Studio Code. In case that you'd like to download a different version please scroll down to the bottom of the site and check the additional options.
Note: Originally, I started using Code 0.1.0 on Xubuntu 14.10 and then upgraded my machine around mid of May. Also, on a different machine running Ubuntu 14.04 LTS I can confirm to use Visual Studio Code successfully.
Unzip the archive
After you downloaded the latest ZIP archive for your architecture, here: VSCode-linux-x64.zip, you should decide where to extract the content of the compressed file. Well, in my case, I'd like to have third party products below the appropriate location, and therefore I usually choose /opt. Eventually you might ask yourself why? Well, here's a decent chapter about the Linux Filesystem Hierarchy written by The Linux Documentation Project (TLDP):
1.13 /opt
This directory is reserved for all the software and add-on packages that are not part of the default installation. For example, StarOffice, Kylix, Netscape Communicator and WordPerfect packages are normally found here. To comply with the FSSTND, all third party applications should be installed in this directory. Any package to be installed here must locate its static files (ie. extra fonts, clipart, database files) must locate its static files in a separate /opt/'package' or /opt/'provider' directory tree (similar to the way in which Windows will install new software to its own directory tree C:\Windows\Progam Files\"Program Name"), where 'package' is a name that describes the software package and 'provider' is the provider's LANANA registered name.
Looks good to me, or?
Anyway, let's just use this as base - given that you're root on the machine - it's surely a good choice, otherwise feel free to unzip the archive in your personal user space below your home directory. Next, let's extract the content as suggested using the console (or terminal in case that you'd prefer this term):
$ cd /opt/opt$ sudo unzip ~/Downloads/VSCode-linux-x64.zip
This is going to create a new directory VSCode-linux-x64 which contains the static binary to run Visual Studio Code on your system. Right now, you would be able to launch the text editor by executing the following command:
/opt$ ./VSCode-linux-x64/Code
Despite some warnings and errors on the console output, similar to those:
[3437:0724/220852:ERROR:browser_main_loop.cc(173)] Running without the SUID sandbox! See https://code.google.com/p/chromium/wiki/LinuxSUIDSandboxDevelopment for more information on developing with the sandbox on.bash: cannot set terminal process group (-1): Inappropriate ioctl for devicebash: no job control in this shell
Visual Studio Code is up and running...

Welcome screen of Visual Studio Code on first start of the text editor
Adding a little bit more comfort
Hopefully, you were able to launch Visual Studio Code based on the description given above. Now, let's add a little bit more comfort to your user experience. Unfortunately, there is no out-of-the-box installation package for the usual distributions - at least not yet, and we are obliged to do some manual steps. Following, I'm going to give you my steps with some brief explanations about the why and how. Of course, there are always multiple choices and you might either skip one or the other step or even have better suggestions. Please use the comment section at the bottom to give me your tips & tricks. Thanks!
Version-(in)dependent folder and symbolic link
Not sure about you but given the manual installation steps I would like to have a better control each time I consider to install a newer version of Code. Also, this helps to keep some adjustments on constant path information like Application launcher and shortcuts to run Visual Studio Code. Okay, let's dig into that and first rename (move) the base directory of Code to a version-specific one:
/opt$ sudo mv VSCode-linux-x64 VSCode-0.5.0
Again, as of writing this article 0.5.0 was the latest available version. Meanwhile, the are good chances that you might have a higher version already - good! Next, I usually create a symbolic soft link back to the newly renamed folder in order to stay version-independent. Sounds confusing, right? Hold on, I'll explain it in a short, and you will see the benefits, too.
/opt$ sudo ln -s VSCode-0.5.0 VSCode
Your own /opt folder might look similar to this one right now:

Extract the Visual Studio Code zip archive below /opt directory and create a version-independent symlink
As you can see on the screenshot I've been using Code since the very beginning, and using this approach I am actually able to keep all versions installed side-by-side next to each other. The most interesting part is the version-independent symlink in the /opt directory. This allows me to launch Visual Studio Code by executing the following line from anywhere:
/opt/VSCode/Code
Like using the Application Finder on Xubuntu after pressing Alt+F2:

Launch Visual Studio Code from the Application Finder with fully qualified path to executable
This scenario gives us a good head start for further activities.
The power of PATH
Now that we have a "fixed" location for Visual Studio Code, it would be more comfortable to avoid to specify the full path information each time that we would like to launch the text editor. Also, looking to some of the cool command line options of Code on other platforms, it would be nice to have them as well on Linux. Okay, then let's do it using the PATH environment variable. The Linux Information Project has a good definition online:
PATH Definition
PATH is an environmental variable in Linux and other Unix-like operating systems that tells the shell which directories to search for executable files (i.e., ready-to-run programs) in response to commands issued by a user. It increases both the convenience and the safety of such operating systems and is widely considered to be the single most important environmental variable.
That sounds exactly like what we are looking for. And in compliance with other operating systems, we are going to create another symlink for our purpose, like this:
~$ sudo ln -s /opt/VSCode/Code /usr/local/bin/code
Changing the letter casing of the executable from proper writing - Code - to lower case writing - code - isn't a typo actually.
Update: Recently, I discovered that the official guide on Setting up Visual Studio Code on Linux also mentions the creation of a symlink as a tip.
Commonly, UNIX and Linux commands are written in lower-case writing anyway, so why should we break with this tradition? Of course, you will be able to launch the text editor now with this new path, too. Either on the console / terminal, like so
~$ code
or using the Application Finder - the choice is yours.

Launch Visual Studio Code from the Application Finder
Thanks to the PATH environment variable we can now completely omit the path information. Linux knows where to find our executable now.
Application launcher in Main Menu
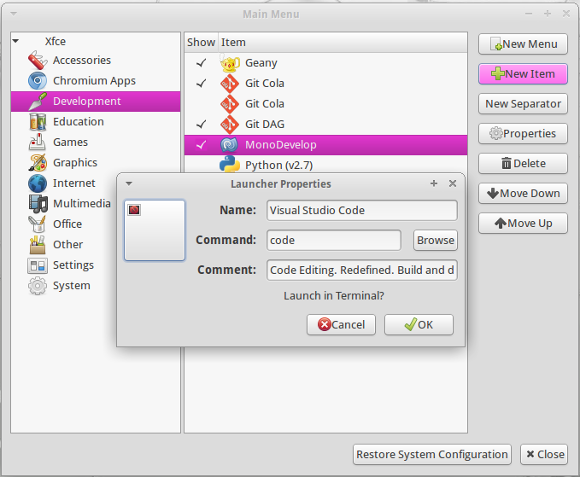
Being able to start Visual Studio Code anywhere from the console has already given us some comfort but compared to Windows and Mac OS X users we are still living in the digital stone age, and no application is fully installed on your Linux OS without an application launcher in your main menu. In Xubuntu you would open Application Menu (or press Alt+F1) - Settings - Main Menu in order to add a new launcher to the menu. In the menu editor select the Development section or any other where you would like to place the launcher and click on New Item to define the Launcher Properties. Eventually, you might like to enter the following on your machine:

Add a new item to the main menu for Visual Studio Code
Unfortunately, this leaves us with an empty icon for now. Quickly open a new terminal and switch to an existing one and let's see which graphics are provided by Microsoft, like so:
~$ find /opt/VSCode/* -type f -iname '*.png'/opt/VSCode/resources/app/vso.png/opt/VSCode/resources/app/client/vs/base/ui/scrollbar/impl/arrow-up.png/opt/VSCode/resources/app/client/vs/base/ui/scrollbar/impl/arrow-left.png/opt/VSCode/resources/app/client/vs/base/ui/scrollbar/impl/arrow-right.png/opt/VSCode/resources/app/client/vs/base/ui/scrollbar/impl/arrow-right-dark.png/opt/VSCode/resources/app/client/vs/base/ui/scrollbar/impl/arrow-left-dark.png/opt/VSCode/resources/app/client/vs/base/ui/scrollbar/impl/arrow-down-dark.png/opt/VSCode/resources/app/client/vs/base/ui/scrollbar/impl/arrow-down.png/opt/VSCode/resources/app/client/vs/base/ui/scrollbar/impl/arrow-up-dark.png/opt/VSCode/resources/app/client/vs/editor/diff/diagonal-fill.png/opt/VSCode/resources/app/client/vs/editor/css/arrow-left.png/opt/VSCode/resources/app/client/vs/editor/css/arrow-right.png/opt/VSCode/resources/app/client/vs/workbench/contrib/daytona/TestPlugin/Resources/Images.png/opt/VSCode/resources/app/client/vs/workbench/contrib/daytona/TestPlugin/Images/FileIdentifier.png/opt/VSCode/resources/app/client/vs/workbench/contrib/daytona/TestPlugin/Images/icon2.png/opt/VSCode/resources/app/client/vs/workbench/contrib/daytona/TestPlugin/Images/icon3.png/opt/VSCode/resources/app/client/vs/workbench/contrib/daytona/TestPlugin/Images/icon1.png/opt/VSCode/resources/app/client/vs/workbench/contrib/daytona/TestPlugin/Images/console-icons.png/opt/VSCode/resources/app/client/vs/workbench/ui/parts/editor/media/letterpress.png/opt/VSCode/resources/app/client/vs/workbench/ui/parts/editor/media/letterpress-dark@2x.png/opt/VSCode/resources/app/client/vs/workbench/ui/parts/editor/media/letterpress-dark.png/opt/VSCode/resources/app/client/vs/workbench/ui/parts/editor/media/letterpress@2x.png/opt/VSCode/resources/app/node_modules/emmet/Icon.png
Alternatively, you might also have a look at the SVG graphics provided by Visual Studio Code.
I chose the vso.png and to simplify my life in regards of future upgrades and unexpected changes, I placed a copy of the graphic file into the usual location on a Linux system:
~$ sudo cp /opt/VSCode/resources/app/vso.png /usr/share/icons/
Hint: Use the Move option in the window menu to relocate the dialog using the arrow keys, and then confirm your selection with a click on the OK button of the dialog.
Your Main Menu editor might look like this now:

Visual Studio Code as proper entry in the main menu of Xubuntu
Congratulations, your new application launcher has been added to the menu and you can either navigate into the Development section (or the one you chose) or type your choice into the application quick filter textbox to find and execute Visual Studio Code.

Navigate the application menu to launch Visual Studio Code

Use the quick filter entry of the application menu to launch Visual Studio Code
Creating a Desktop Entry file
As we are working with Linux there are always multiple ways to achieve the same or similar result. And eventually you might prefer the possibility to create and use a file-based application launcher which adds itself to the menu structure automatically. Creating a .desktop file is not too challenging and requires a simple text editor - like Visual Studio Code ;-) - to write the following definition into it:
[Desktop Entry]Version=1.0Encoding=UTF-8Name=Visual Studio CodeGenericName=Integrated Development EnvironmentComment=Code Editing. Redefined. Build and debug modern web and cloud applications.Exec=codeTryExec=codeIcon=vsoStartupNotify=trueTerminal=falseType=ApplicationMimeType=text/x-csharp;application/x-mds;application/x-mdp;application/x-cmbx;application/x-prjx;application/x-csproj;application/x-vbproj;application/x-sln;application/x-aspx;text/xml;application/xhtml+xml;text/html;text/plain;Categories=GNOME;GTK;Development;IDE;
Save it as vscode.desktop and then put this file into the appropriate location for a Linux system:
~$ sudo cp vscode.desktop /usr/share/applications/vscode.desktop
Thanks to the proper location of the shared icon and the symlinks we created earlier, we do not have to specify any absolute paths in our Desktop Entry file. As soon as the file has been copied below the shared applications folder it automatically appears in your main menu and is ready to be used.
For your extra comfort you might like to download the vscode.desktop file. You will have to rename the file and place it accordingly on your system.
Make it a launcher in Cairo Dock
As for the different options of Ubuntu I have to admit that I'm a long-year user of the Xfce environment, called Xubuntu, and on top I also like using a flexible dock panel (or two or three). Cairo dock is a fantastic package in case that you would like to have a little bit of Mac OS X flavour on your Linux desktop, and adding a launcher for Visual Studio Code is very simply to do.

Add Visual Studio Code to a dock panel like cairo dock or similar
First, run Visual Studio Code using one of the previously described methods. Next, after the application runs and an icon of code appears in the dock panel right-click the icon, then select the sub-menu entry "Make it a launcher" from the "code" context menu entry and you're done. That's actually similar to pinning an application to the taskbar in Windows 7, Windows 8 or Windows 10. Close the text editor and your new launcher will still remain in the dock panel.
Resume on installing Visual Studio Code
Without any question it is fantastic to have an identical text editor for all three major operating system. But Linux users are currently confronted with some lack of comfort compared to their Windows and Mac OS X friends. Although there are several and in my opinion easy ways to increase the user experience in using Visual Studio Code under Linux I'm a bit concerned whether Microsoft is keeping it on par to the other systems. Right now, installation takes some manual steps, there are essential parts missing in order to provide an excellent first contact and other editor features like automatic updates aren't yet available for the Linux variation compared to Windows and Mac OS X.
Bearing in mind that the product has been launched back in April/May this year only and we are currently on version 0.5.0, I am very interested in the future development. The documentation online has some neat features for you, and the team at Microsoft has an open ear to the feedback and wishes given on their UserVoice website, too.
That's all for the installation part of Visual Studio Code. Please leave your comments as well as tips & tricks for me.
Happy coding!